
Introduction: Cake Pop Recipe
Who doesn’t love a sweet treat that’s not only delicious but also fun to eat? Cake Pop Recipe makes the perfect combination of cake and lollipop, making them a hit at any gathering or as a delightful snack. In this article, we’ll dive into the world of cake pops, exploring everything from the basic recipe to creative decorating ideas. So, grab your apron and let’s get started on this culinary adventure!
you can also upgrade your baking skills by checking our article Toll House Cookie Recipe: Baked To Perfection , check out our detailed recipe and guide, with step-by-step instructions and tips for making the best Toll House cookies. Discover the secrets to achieving that perfect texture and flavor.
Cake Pop Recipe: Made To Perfection

Cake pops, those delightful little cake-on-a-stick treats, have taken the dessert world by storm with their fun presentation and versatile flavors. Essentially a cake bite on a stick, cake pops are the perfect party treat, offering a unique way to enjoy cake in bite-sized portions. This cake pop recipe will guide you through the process of creating these adorable and delicious sweets.
Cake Pop Recipe Ingredients:
- 1 box cake mix (flavor of your choice) and ingredients required for baking (usually eggs, oil, and water)
- 1 can frosting (approximately 16 ounces, matching the cake flavor)
- Candy melts or chocolate chips for coating (12-16 ounces)
- Lollipop sticks
- Sprinkles, crushed nuts, or other decorations (optional)
Step-by-Step Cake Pop Recipe’s Instructions:
-
Bake the Cake:
- Prepare and bake the cake according to the instructions on the cake mix box. Choose any flavor you like—chocolate, vanilla, red velvet, or any other favorite.
- Once baked, allow the cake to cool completely before proceeding to the next step.
-
Crumble the Cake:
- After the cake has cooled, break it into pieces and crumble it into a large mixing bowl. The texture should be fine, without any large chunks.
-
Add the Frosting:
- Add a few spoonfuls of frosting to the crumbled cake. Start with about half a can, and mix thoroughly. You want the mixture to be moist enough to form a ball without falling apart, but not too wet. If needed, add more frosting until you achieve the right consistency.
-
Form the Cake Balls:
- Take a small amount of the cake mixture and roll it into a ball, approximately 1-1.5 inches in diameter. Repeat this process until all the mixture is used, placing the cake balls on a baking sheet lined with parchment paper.
-
Chill the Cake Balls:
- Place the cake balls in the refrigerator for at least 1 hour, or in the freezer for about 30 minutes. Chilling helps them firm up, making them easier to dip in chocolate.
-
Melt the Coating:
- While the cake balls are chilling, melt the candy melts or chocolate chips according to the package instructions. This usually involves microwaving in short bursts and stirring in between. Use a microwave-safe bowl for this step.
-
Insert the Sticks:
- Remove the cake balls from the refrigerator or freezer. Dip one end of the lollipop stick into the melted coating and then insert it into the center of a cake ball. This step helps the stick stay in place.
-
Dip the Cake Pops:
- Carefully dip each cake pop into the melted coating, ensuring it is fully covered. Gently tap off any excess coating and place the cake pop upright in a stand (a block of styrofoam or an upside-down colander works well).
-
Add Decorations:
- Before the coating hardens, add your decorations—sprinkles, crushed nuts, or other edible adornments. Allow the cake pops to set completely.
-
Serve and Enjoy:
- Once the coating has hardened, your cake pops are ready to serve. Enjoy them at parties, gatherings, or as a sweet treat anytime.
With this cake pop recipe, you can create a wide variety of flavors and decorations, making them perfect for any occasion. Experiment with different cake and frosting combinations, as well as various coatings and decorations, to create your unique cake pops.
Preparing the Cake Batter for Cake Pop Recipe
Preparing the cake batter is the first step in making cake pops. It’s crucial to ensure the batter is properly mixed and baked, as this will affect the texture and taste of the final product. Here’s a guide on how to prepare cake batter for cake pops:
1. Select Your Cake Mix
Choose your favorite cake mix flavor. Popular options include chocolate, vanilla, red velvet, lemon, and funfetti. You can also use homemade cake batter, but for simplicity, box mixes work well for cake pops.
2. Gather the Required Ingredients
Each cake mix will have specific ingredients required for preparation, typically including eggs, oil, and water. Have these on hand, along with mixing bowls and utensils.
3. Preheat Your Oven
Set your oven to the temperature specified on the cake mix box. This step ensures the oven is ready once you have the batter prepared.
4. Prepare the Cake Mix
In a large mixing bowl, combine the cake mix with the required ingredients. Follow the instructions on the box for the correct amounts. Use a hand mixer or stand mixer to combine the ingredients until the batter is smooth and free of lumps.
5. Avoid Over-Mixing
While it’s important to ensure the batter is thoroughly mixed, be careful not to over-mix. Over-mixing can lead to a dense or tough cake, which is not ideal for cake pops.
6. Grease Your Baking Pan
To ensure the cake doesn’t stick, lightly grease your baking pan with cooking spray or butter. You can also line the bottom with parchment paper for easier removal.
7. Pour and Level the Batter
Pour the cake batter into the prepared baking pan. Use a spatula or knife to spread the batter evenly across the pan, ensuring it has a smooth surface.
8. Bake the Cake
Place the pan in the preheated oven and bake according to the time specified on the cake mix box. Check for doneness by inserting a toothpick into the center of the cake; it should come out clean when the cake is done.
9. Cool the Cake
Once the cake is baked, remove it from the oven and let it cool in the pan for about 10 minutes. After that, carefully remove the cake from the pan and let it cool completely on a wire rack. It’s crucial to ensure the cake is completely cool before proceeding to the next steps in making cake pops.
By following these steps, you can prepare a smooth and well-textured cake batter that’s perfect for creating delicious cake pops. The key is to achieve a cake that is moist but not too crumbly, allowing it to be shaped into balls and hold together with frosting and coatings.
Crumbing the Cake for Cake Pop Recipe
Crumbing the cake is a crucial step in making cake pops. This process involves breaking the cake into fine crumbs, which are then combined with frosting to create a dough-like consistency. Here’s how to do it properly:
1. Ensure the Cake is Completely Cooled
Before you start crumbing the cake, make sure it has cooled completely. A warm cake will create uneven crumbs and may not mix well with the frosting.
2. Break the Cake into Pieces
Begin by breaking the cake into smaller pieces. You can do this with your hands or by cutting the cake into smaller chunks with a knife. This step makes it easier to create uniform crumbs.
3. Crumble the Cake
Using your hands, a fork, or a food processor, crumble the cake into fine pieces. The goal is to create a texture similar to breadcrumbs. If using a food processor, pulse the cake in short bursts to avoid turning it into a paste.
4. Check for Large Chunks
As you crumble the cake, ensure there are no large chunks. If you find any, break them down further to maintain a consistent texture throughout.
5. Transfer to a Mixing Bowl
Once the cake is fully crumbled, transfer it to a large mixing bowl. This will give you enough space to combine the crumbs with frosting in the next step.
6. Store the Crumbs if Needed
If you’re not ready to continue with the cake pops immediately, you can store the cake crumbs in an airtight container. This way, you can use them later without worrying about them drying out.
By following these steps, you’ll have the perfect cake crumbs to create the base for cake pops. The fine and consistent texture of the crumbs will ensure that the cake pops hold together well when mixed with frosting and shaped into balls.
Adding Frosting to Cake Pops
Adding frosting to cake crumbs is the step where cake pops truly take shape. The frosting acts as a binder, helping the crumbs stick together to form the cake pop base. Here’s a guide on how to add frosting to cake pops effectively:
1. Choose Your Frosting
Start by selecting a frosting that complements the flavor of your cake. Traditional choices include vanilla, chocolate, or cream cheese, but you can experiment with other flavors like caramel or peanut butter for a unique twist.
2. Add a Little at a Time
To avoid making the mixture too wet, start with a small amount of frosting. A good rule of thumb is to begin with about half of a standard 16-ounce can. You can always add more if needed.
3. Mix Thoroughly
Use a spatula or your hands to mix the frosting into the cake crumbs. Be gentle but thorough, ensuring the frosting is evenly distributed throughout the crumbs. The texture should be moist enough to hold together when pressed but not too sticky.
4. Test the Consistency
Take a small amount of the mixture and roll it into a ball. If it holds together without crumbling, you’ve added enough frosting. If it feels too dry, add a little more frosting and mix again. But If it’s too sticky, add more cake crumbs to balance it out.
5. Adjust as Needed
It’s common to need slight adjustments to get the right consistency. Continue to add frosting or cake crumbs as needed to achieve the perfect texture for cake pops.
6. Use for Cake Pops
Once the frosting is evenly incorporated and the mixture has the right consistency, you’re ready to form the cake pops. At this stage, you can roll the mixture into balls, insert sticks, and proceed with chilling and coating.
Tips for Success: The Best Cake Pop Recipe
- Use Room Temperature Frosting: Cold frosting can be difficult to mix, while warm frosting might make the mixture too wet.
- Avoid Over-Mixing: Over-mixing can cause the mixture to become too dense, affecting the texture of the cake pops.
- Experiment with Flavors: Don’t be afraid to try different frosting flavors to add variety to your cake pops.
Adding frosting is a key step in making cake pops, determining how well the cake balls hold together and how they taste. By following these steps, you’ll create a mixture that’s easy to shape and delicious to enjoy.
Rolling the Cake Balls for Cake Pop Recipe
Rolling the cake balls is a crucial step in creating cake pops. This process determines the shape and size of your cake pops, ensuring they are consistent and ready for dipping and decoration. Here’s how to do it correctly:
1. Prepare the Cake Mixture
After adding frosting to your cake crumbs, you should have a dough-like consistency that’s moist enough to hold together when pressed. Make sure the mixture is well-mixed and free of large lumps.
2. Use a Cookie Scoop for Consistency
To ensure that each cake pop is uniform in size, use a cookie scoop or a similar tool to measure the mixture. This step is important for even cooking and a consistent appearance.
3. Roll Into Balls
Take a portion of the cake mixture from your cookie scoop and roll it between your palms to form a smooth, round ball. Aim for a size of about 1 to 1.5 inches in diameter, but you can adjust based on your preference.
4. Check for Smoothness
Ensure each cake ball is smooth with no cracks or uneven surfaces. If you notice cracks, re-roll the ball until it’s smooth. This helps achieve a better coating and presentation.
5. Place on a Lined Baking Sheet
As you roll each cake ball, place it on a baking sheet lined with parchment paper. This prevents the cake balls from sticking and makes it easier to chill them later.
6. Chill the Cake Balls
Once all the cake balls are rolled, chill them in the refrigerator for at least 1 hour. This helps them firm up, making them easier to dip and less likely to fall apart during coating.
Tips for Rolling Cake Balls:
- Apply Light Pressure: Rolling with light pressure prevents the cake balls from becoming too dense.
- Keep Your Hands Clean: If the mixture starts sticking to your hands, wash them and dry thoroughly before continuing.
- Consistent Size: Consistency in size helps with even coating and a uniform appearance for your cake pops.
Rolling the cake balls is an essential step in creating cake pops, ensuring they are ready for the sticks and the coating process. By following these steps, you’ll achieve evenly sized cake balls that are perfect for the next stage of cake pop preparation.
Inserting Lollipop Sticks for Cake Pop Recipe
Inserting lollipop sticks into cake pops is a delicate process that ensures your cake pops remain stable during dipping and serving. This step is crucial for creating a reliable base for your cake pops. Here’s a guide on how to do it effectively:
1. Prepare the Lollipop Sticks
Start by gathering the lollipop sticks. Ensure they are clean and dry. You can use standard lollipop sticks or cake pop sticks, typically made of plastic or paper. The length of the sticks depends on personal preference and the depth of your cake pop stand or holder.
2. Melt a Small Amount of Coating
Melt a small amount of the coating you plan to use for the cake pops. Candy melts or chocolate work well. This melted coating will act as an adhesive to keep the sticks in place.
3. Dip the Stick into the Coating
Take a lollipop stick and dip one end into the melted coating, about half an inch deep. This step is crucial because it helps anchor the stick in the cake ball, reducing the risk of it falling out later.
4. Insert the Stick into the Cake Ball
Immediately after dipping the stick, insert it into the center of the cake ball, pushing it about halfway through. Make sure the stick is straight and not poking out the other side. This step requires a gentle touch to avoid cracking the cake ball.
5. Secure the Cake Ball
After inserting the stick, gently press the cake ball around the stick to ensure it is firmly in place. The melted coating will harden as it cools, providing additional stability.
6. Chill the Cake Pops
Once the sticks are inserted into all the cake balls, return them to the refrigerator or freezer for at least 30 minutes. Chilling helps the coating set, providing a strong bond between the cake ball and the stick.
Tips for Inserting Lollipop Sticks:
- Use a Steady Hand: Insert the stick with a steady hand to ensure it’s centered and straight.
- Don’t Insert Too Deeply: If the stick is pushed too far, it may cause the cake ball to crack or break.
- Allow Time to Set: Chilling after inserting the sticks ensures a secure bond, reducing the risk of the cake pops falling off during dipping.
Inserting lollipop sticks is a crucial step in making cake pops, providing the stability needed for dipping and decorating. By following these steps, you’ll create cake pops that are secure and ready for the final stages of preparation.
Chilling Cake Pop Recipes
Chilling cake pops is an essential step that helps them firm up, making them easier to dip and decorate. Proper chilling prevents the cake balls from falling off the sticks during the dipping process. Here’s how to do it right:
- Refrigerate or Freeze: After inserting the lollipop sticks into the cake balls, place them in the refrigerator for at least 1 hour or in the freezer for about 30 minutes. This ensures they are firm and less likely to break apart.
- Use a Baking Sheet: Arrange the cake pops on a lined baking sheet to prevent sticking. If you’re using the freezer, ensure the sheet is flat and there’s enough space to accommodate the cake pops.
- Avoid Over-Chilling: If you leave the cake pops in the freezer too long, they may become too hard and crack when dipped. Chilling them just enough for stability is ideal.
Dipping Cake Pops in Candy Melts
Dipping cake pops in candy melts or chocolate is the step that gives them a smooth, colorful coating. Here’s how to achieve the best results:
- Melt the Candy Melts: Use a microwave-safe bowl to melt the candy melts or chocolate in short bursts, stirring frequently to avoid burning. You can also use a double boiler for more control.
- Dip the Cake Pops: Hold the lollipop stick and dip the cake pop into the melted coating, ensuring it’s fully submerged. Gently tap off any excess coating to prevent drips and maintain a smooth finish.
- Use a Stand to Set: After dipping, place the cake pops upright in a stand or block of styrofoam to set. This keeps them from touching any surface and allows the coating to harden evenly.
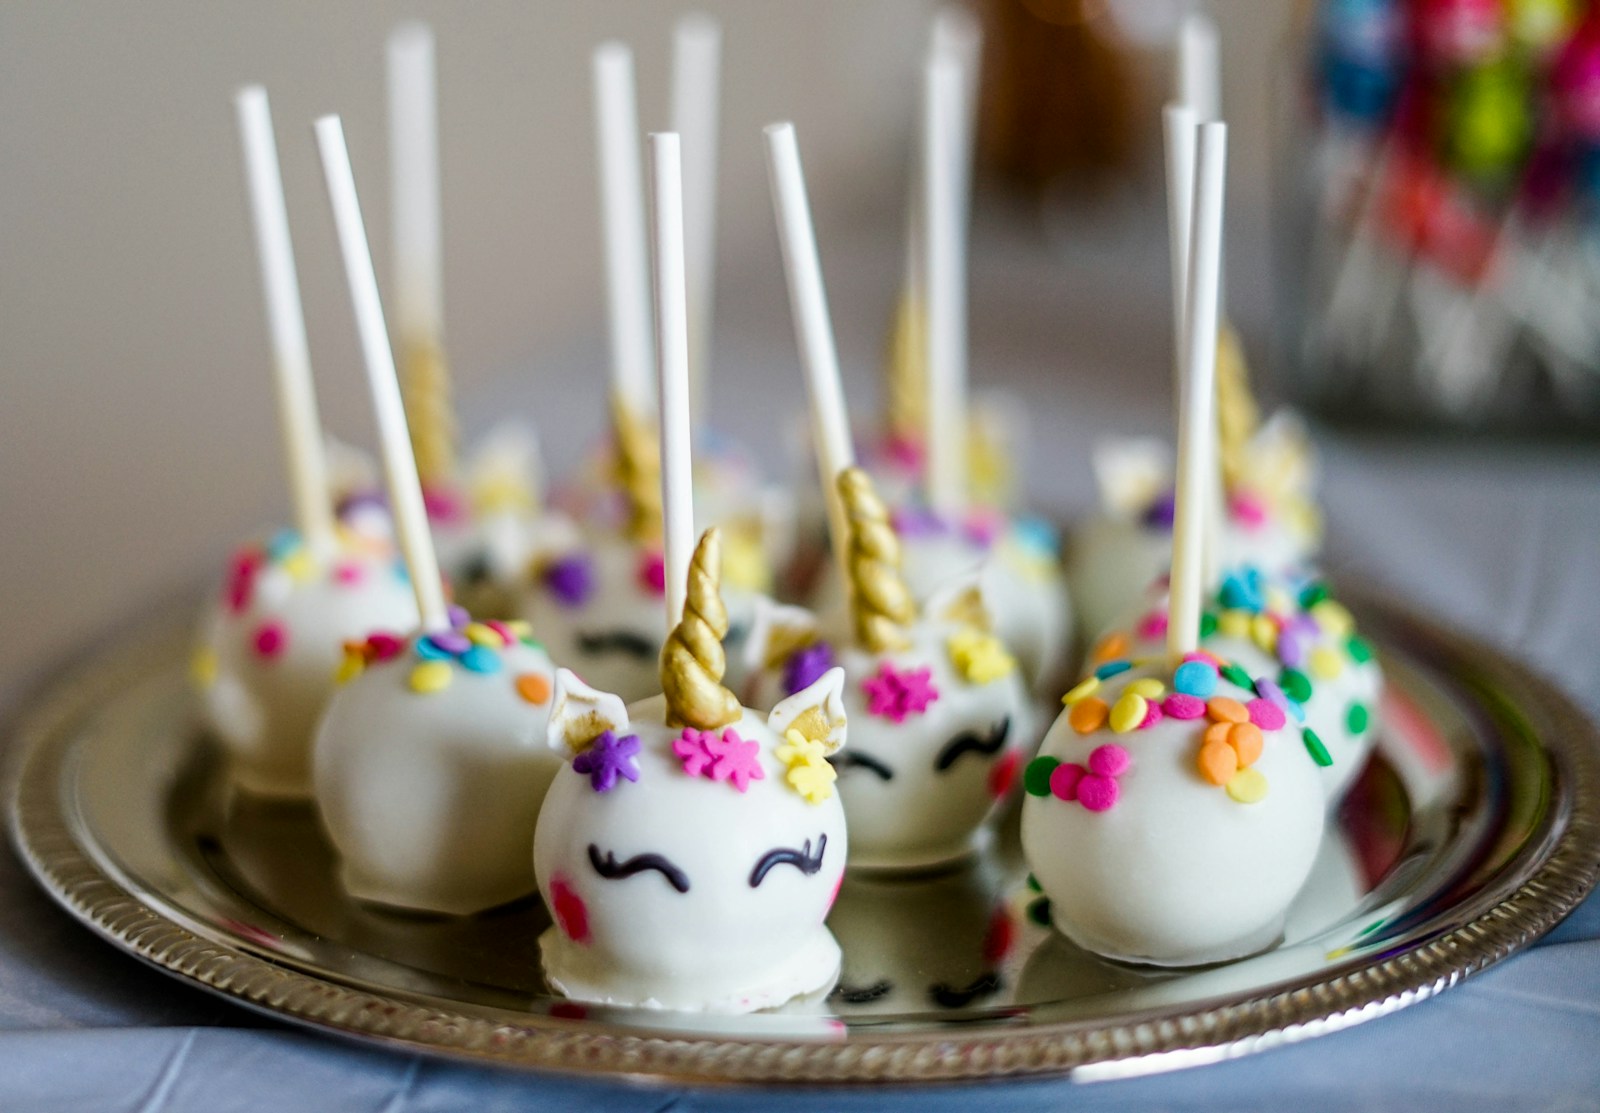
Decorating Cake Pops
Decorating cake pops is where you can unleash your creativity. Here are some ideas for making your cake pops stand out:
- Add Sprinkles or Toppings: While the coating is still wet, sprinkle on colored sugar, nonpareils, or other decorations to add color and texture.
- Use Edible Markers: After the coating has hardened, use edible markers to draw designs or write messages on the cake pops.
- Create Themed Designs: For holidays or special occasions, use themed decorations or shapes to match the event. For example, create cake pops that look like pumpkins for Halloween or hearts for Valentine’s Day.
Enjoying Cake Pops
Cake pops are a delightful treat, perfect for sharing or enjoying on your own. Here’s how to make the most of them:
- Serve Fresh: Cake pops are best enjoyed fresh, within a few days of preparation. Store them in an airtight container at room temperature or in the refrigerator to keep them from drying out.
- Gift Them: Cake pops make excellent gifts or party favors. Wrap them individually in cellophane bags and tie them with a ribbon for a special touch.
- Share with Friends and Family: Cake pops are a great addition to parties, gatherings, or casual get-togethers. Their bite-sized nature makes them easy to share and enjoy.
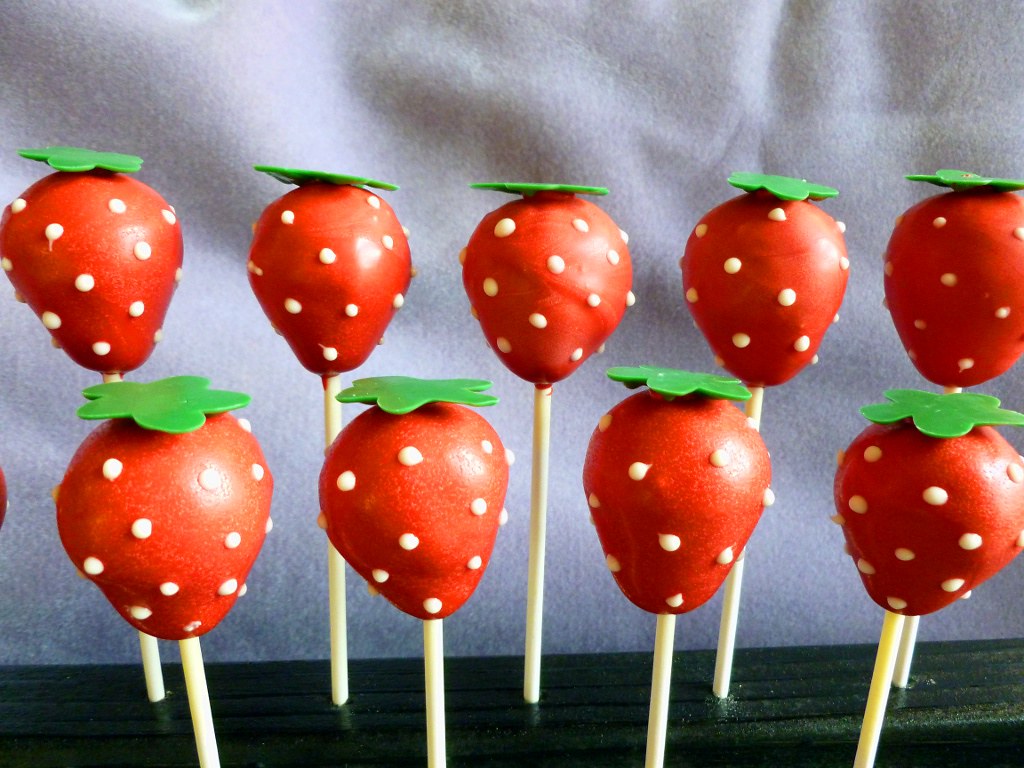
Creative Variations for Cake Pop Recipe
Cake pops offer endless possibilities for creativity. Here are some ideas for varying your cake pops:
- Experiment with Flavors: Try different cake and frosting combinations, such as chocolate cake with mint frosting or red velvet cake with cream cheese frosting.
- Use Different Coatings: Instead of traditional candy melts, use white chocolate or dark chocolate for a different flavor profile.
- Shape Them Creatively: Use molds or shape the cake pops by hand to create unique designs, like animals, characters, or holiday-themed shapes.
With these steps and ideas, you’ll be able to create cake pops that are not only delicious but also visually appealing and perfect for any occasion. Enjoy your cake pop-making journey!
Conclusion: The Joy of Cake Pop Recipe
Cake pops offer a delightful and creative way to enjoy cake in bite-sized portions. From their inception, cake pops have captured the imagination of bakers and dessert enthusiasts alike, thanks to their versatility, easy customization, and fun presentation. Whether you’re a novice or an experienced baker, creating cake pops is a rewarding process that allows for endless experimentation with flavors, coatings, and decorations.
To make the perfect cake pops, you need to balance key steps: from baking the cake and creating the right consistency with frosting, to carefully rolling the cake balls and ensuring the sticks are firmly in place. Chilling the cake pops before dipping is crucial to prevent them from falling apart, and the choice of coating can add an extra layer of flavor and visual appeal.
Decorating cake pops provides a chance to unleash your creativity, whether you’re using sprinkles, edible markers, or creating themed designs for special occasions. And when it comes to enjoying cake pops, they are ideal for parties, gatherings, or simply as a sweet treat to share with family and friends. Their portability and ease of serving make them a perfect addition to any dessert table.
Overall, cake pops embody the joy of baking and the excitement of trying new things. With this guide, you’re equipped with the knowledge and inspiration to create your own unique cake pops, whether you’re following a classic recipe or putting your own twist on this beloved treat. Enjoy the process, and may your cake pops bring smiles and sweet memories to everyone who tastes them.
Read our article Toll House Cookie Recipe: Baked To Perfection , with step-by-step instructions and tips for making the best Toll House cookies, it will be an amazing opportunity to learn a new dessert recipe.
FAQs on Cake Pop Recipe
What is cake pop dough made of?
Cake pop dough is typically made of crumbled cake mixed with frosting to create a dough-like consistency. The cake is baked and then crumbled into fine pieces, which are then combined with frosting to bind them together. This mixture is what allows the cake balls to be formed and shaped before they are chilled, dipped, and decorated.
How many cake pops does 1 box of cake mix make?
The number of cake pops you can make from one box of cake mix depends on the size of the cake balls and how much dough you use per pop. Typically, one box of cake mix can yield anywhere from 24 to 36 cake pops. This range accounts for variations in cake ball size and the amount of frosting used to create the dough.
What is cake pop icing made of?
Cake pop icing can refer to the frosting mixed with the cake crumbs or the coating used for dipping. The frosting used to bind the cake crumbs is often standard cake frosting, like vanilla, chocolate, or cream cheese. The coating for dipping cake pops is typically made from candy melts or melted chocolate, which hardens to create a smooth outer layer. Candy melts are popular for their variety of colors and flavors.
What are Starbucks cake pops made of?
Starbucks cake pops are made using a similar process to traditional cake pops. They consist of a mixture of cake crumbs and frosting, formed into cake balls and dipped in a candy melt or chocolate coating. Starbucks offers a range of flavors and designs, with the most popular being birthday cake (vanilla cake with pink candy coating) and chocolate cake with a chocolate coating. They may also be decorated with sprinkles or other edible adornments for a festive touch.